Archive
Modify Content Query webpart data programmatically
when ever we want to modify some data from content query webpart either we use out of the box XSLT functions or XSLT extensions.
but sometimes XSLT functions can not help us to achieve desired functionality and some times , some..times…XSLT extensions are not allowed, so what do to do in such scenario.
yes …YES..we have a way..we can modify the data of the content query webpart pro-grammatically.
lets see how..and how easy it is as compared to XSLT extensions.
I have a custom list which has two columns
1) Title
2) LastName
and we have a need to combine Title with Title, lets see how this can be achieved by modifying content query webpart data programmatically.
List Data

 [ToolboxItemAttribute(false)]
    public class ExtendedContentQueryDemoWebpart : ContentByQueryWebPart
    {

        protected override void OnInit(EventArgs e)
        {
            this.ProcessDataDelegate += new ProcessData(modifyData);
            base.OnInit(e);
        }

        private DataTable modifyData(DataTable dt)
        {
            foreach (DataRow item in dt.Rows)
            {
                item["Title"] = item["Title"].ToString() + " " + item["LastName"].ToString();
                item.AcceptChanges();
            }
            return dt;
        }

    }
Inherit your webpart class by ContentByQueryWebPart .
ContentByQueryWebPart class is present it Microsoft.SharePoint.Publishing.WebControls namespace which is present in Microsoft.SharePoint.Publishing.dll which is located at C:\Program Files\Common Files\Microsoft Shared\Web Server Extensions\14\ISAPI\Microsoft.SharePoint.Publishing.dll
this.ProcessDataDelegate : aha..this is the key, to this delegate we can attach a function which takes datatable as input and returns datatable as output.
Now I have deployed the webpart as a farm solution , also added it to the webpart page, basic configurations for content query webpart.
List from which we need to show the data

Fields to display [content query webpart, will query and bring these fields from the list.]

Click Ok..Aha we are done..so easy
it looks as below.

let me know if you have any questions.
Import Excel sheet as SharePoint List
Today I stumbled upon new feature of SharePoint 2010, Uploading excel spread sheet as SharePoint list.
I found it quite interesting and useful.
Here is how its done.
We will create a excel sheet having two columns[coutryname and countrycode] and upload it in SharePoint as SharePoint list , along with data.
Open excel[i,m using office 2010]
Click on Insert Tab

Click on very first cell of excel and then click on table , a popup window[create table] will come up, tick the checkbox next to my table has headers.

Below screen will come up

Rename column1 to countryname add one more column , name it as countrycode
And enter some dummy data.


Save your excel sheet .Name it as country.
Now click on site actions tab, then click on more options.

A popup window for create will come up select on import spreadsheet then click on create.

Below screen will come up, click on browse to select saved excel sheet.

Enter the name of list[this name will appear as list name in sharepoint]
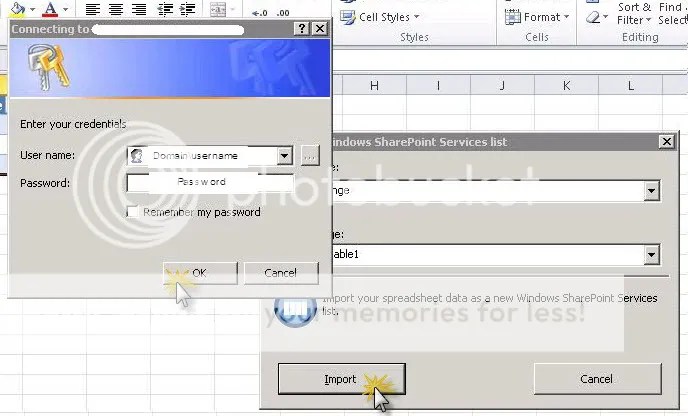
When you click on import. below screen will come up,

Keep the range Type as Table Range and Click on select range and select Sheet1!Table1 from drop down list.


Click on import , a window asking your credentials will pop up, provide user name and password
Data gets imported and you can see SharePoint list created in your site.

We are done..so simple ..yet so gr8
List Definition using sandbox in sharepoint 2010
I wanted to create list definition in 2010, like every developer the first thing which came up in my mind was Google.
This are two thread which came up
http://msdn.microsoft.com/en-us/library/ff728096.aspx
http://johanolivier.blogspot.com/2010/05/developing-list-definition-in.html
But there were drawback of these approaches
1) They were deployed as farm solution, I wanted sandbox solution
2) They require content type, so when you create list definition a content type gets created in your Site, I wanted columns to come from metadata not from content type.
So after doing good amount of RND I found how to create list definition using sandbox solution.
I will explain step by step how to do it
Open Visual studio and select sharepoint tab, select 2010 and using Empty SharePoint project template create a project.

Enter the site name where you want to deploy the list definition; we will deploy it as sandbox solution.

Click finish, project will be created.
Now click on Add new item to project. Select list definition, provide the name and click on Add.

When you will click on Add below window will come up, provide name of list definition[this name will come up as list definition name in your SharePoint site], In this case we are going to create custom list so we will select custom list as list definition type.

Click Finish, VS will add features, package, list instance automatically; your project should look like below screen shot.

Open Schema.xml file under SampleListDef level.

If you open content types section you will see this
Remove ContentTypeRef ID=”0x01” section, your content type structure will look like this

Now Add new contentType [don’t add ContentTypeRef] provide it with ID and all the attributes.
ID should be given as follows
0x0100-Guid

Now we need to add Custom columns which we need to add to our SampleList in FieldRefs section.
Each fieldRef should have ID and Name
After Adding fieldRef in content type , we need to Add those fields with additional attributes in <Fields></Fields Section.
Now we need to add Custom columns which we need to add to our SampleList in FieldRefs section.
Each fieldRef should have ID and Name

After Adding fieldRef in content type , we need to Add those fields with additional attributes in <Fields></Fields Section.

Sample Fields
<Field Type=”Text” DisplayName=”Country Code” Required=”FALSE” EnforceUniqueValues=”FALSE” Indexed=”FALSE” MaxLength=”255″ ID=”{26da1ec9-b18b-4b9e-9c41-ed060038de6e}” StaticName=”Country_Code” Name=”Country_Code” ColName=”nvarchar4″ RowOrdinal=”0″ />
<Field Type=”Number” DisplayName=”SortOrder” Required=”FALSE” EnforceUniqueValues=”FALSE” Indexed=”FALSE” ID=”{8f35d3fe-0c20-4b5d-b970-d1630a0c5519}” StaticName=”SortOrder” Name=”SortOrder” ColName=”float1″ RowOrdinal=”0″ />
Note : ID of this field and ID of fieldref in contenttype should be same. Your shema.xml should look like this.
Now Add Those fields in Viewfields section as shown below

That’s it , just right click on project and then deploy it.

Once it is deployed you will be able to see sampleListDef-ListInstance 1, List instance created in your site.There is no need to reset IIS as this is sandbox solution.
This name is coming from


Let go and check how our list looks

looks good..what say..lets click add new

i,m impressed with that dialoge box, lets save the data

its working, now the last and most important..lets see if List definition was created.

Ahh.it there…
let me know if you have any questions.

